Periodic invoice templates are used to create recurrent invoices. To create a periodic invoice, first, it must create a periodic product. Then it needs to create a periodic invoice template using the periodic product.
Periodic invoice – List view

- Filter by billing period. (Monthly, Quarterly, and Yearly)
- Number of records per page
- General search
- Create a new periodic invoice template
- Edit an existing template
- Delete the existing invoice template. It is possible to delete only if no invoices are generated using this template.
- Invoice recipients. (i.e. the total number of users who will receive the invoices generated using the selected template).
- Number of excluded users from the invoice template.
- a Total number of eligible users for the particular invoice template.
- Invoice billing period. (Monthly, Quarterly, and Yearly).
- Template created date.
- Sent date of the last invoice using this template.
- Log
- Option to set the record as “main template”. If enabled, the future members will be added to the main template.
- Status.
Create a new periodic invoice template
Users can move to create a new periodic invoice template wizard by clicking on the (+) icon on the top of the list view.
Step 1 – Initiate the new template and add products

- Type name at user’s preference.
- Select products that need to be added with the template. Only the periodic products and group contract products are loaded to the dropdown so that the user cannot add any one-time product by mistake. Users should select the product from the dropdown and click the (+) button to add the product.
- It is given an option for the user to add multiple periodic products to one template. To create such a combination, all the selected periodic products should be in the same billing cycle. (Example: Yearly). Further, it is not possible to mix periodic and group contract products under a single template.
- Once all the products are added, the user can move to the next section to set the billing parameters.
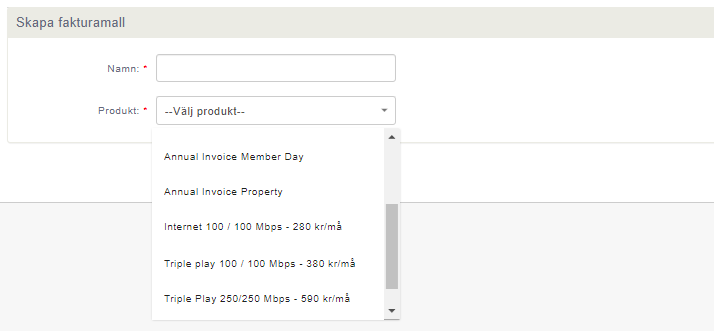
- If the selected product is a group contract product, it needs to select the subscription period from the dropdown.

- Once the product is selected and added (using the + button), it will display the details of the product for the user to configure.
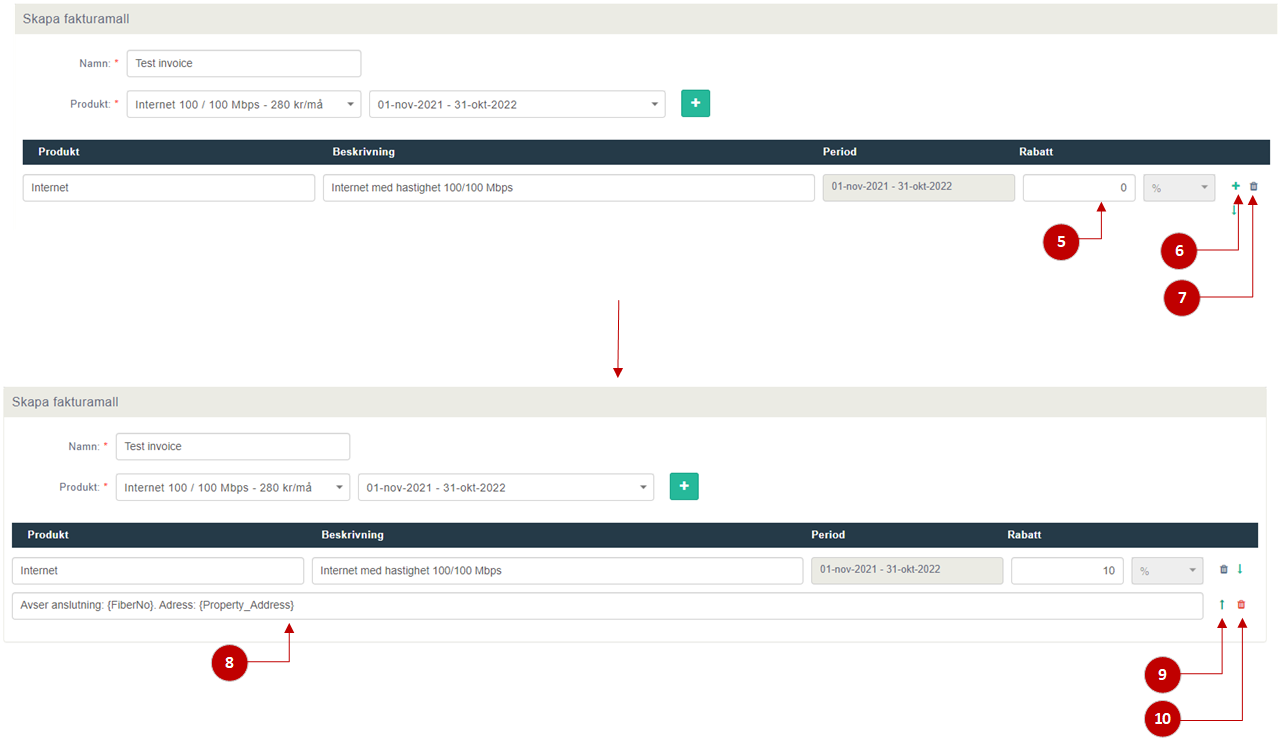
- Set the discount percentage
- Option to add additional text. suggested additional text is depending on the nature of the periodic product.
- Remove the selected product from the template
- The field to enter additional text. System suggestion is loaded by default.
- Sort product likes.
- Remove selected product.
Click on “Invoice bill parameters” button to move to the step 2 of the wizard.
Step 2 – Set billing parameters
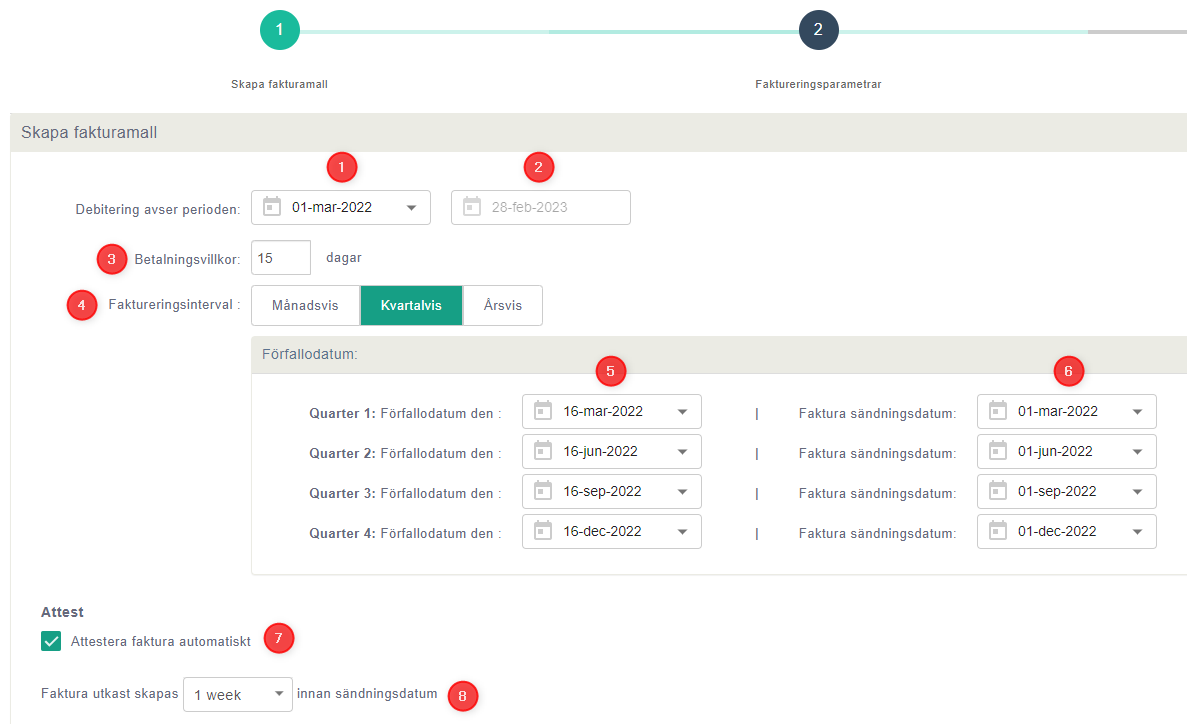
- Start date of the charging period – Set the start date of the charging period of the periodic invoices that is generated through this template. User is required to set the start date.
- End date of the charging period – This is the end date of the charging period of the invoices generated using this template. This is a read only field. When the user is set the start date, then the system checks the time period of the periodic product that is associated with the template (in wizard no 1), and automatically sets the end date.
-
- Example: Assume the product associated with is annual subscription fee (which is valid for one year). If the user sets the start date as 1st March 2022, then the end date will be automatically set to 28th February 2023 (for period of one year).
- Payment terms (Payment period) – This is the time period given for the subscriber to settle the periodic invoice.
- Billing interval (billing cycle)- This is the frequency of the periodic invoice. The system allows the billing cycles depending on the product associated with the template.
- Example: Monthly invoices, Quarterly invoices, Annual invoices
- Due date of each billing cycle – This is the billing cycle vise payment due date. User is required to set the due date of the first billing cycle . Upon setting the first due date, the due dates for the other billing cycles are automatically set.
- Invoice shipping date – This is the date the invoices will be sent for each billing cycle . When the due date for the billing cycle is set by the user, the shipping dates of each billing cycle is automatically set by the system using following formula.
- Invoice Shipping date = Payment due date of the billing cycle – Payment period allowed.
- Example: If the payment due date for the first billing cycle is 16th March 2022 and the payment period allowed is 15 days, then the invoice shipping date will be 16th March – 15 days = 1st March 2022.
- Note: If the payment due date is changed in one billing cycle, the payment due dates and the invoice shipping dates of all the latter billing cycles will be changed. But, if the invoice shipping date is changed in one billing cycle, the payment due date only in that particular billing cycle will be adjusted.
- Invoice Confirmation – This is the option given for the admin to set whether he gives the consent to create and send the invoices that are been created using this template. If this leaves unticked, then the system will create the invoices in draft state and will wait for the admin approval to create and send the invoice.
- Draft invoice creation period – This is the indicator for the system when to create the draft invoices for a particular invoice cycle.
- Draft invoice creation date = Invoice shipping date – number of weeks defined in this field.
- Example: if the draft invoice creation period is 1 week and the invoice shipping date is 28th February 2022, then the draft invoices should be created for the first quarter on 21st February 2022.
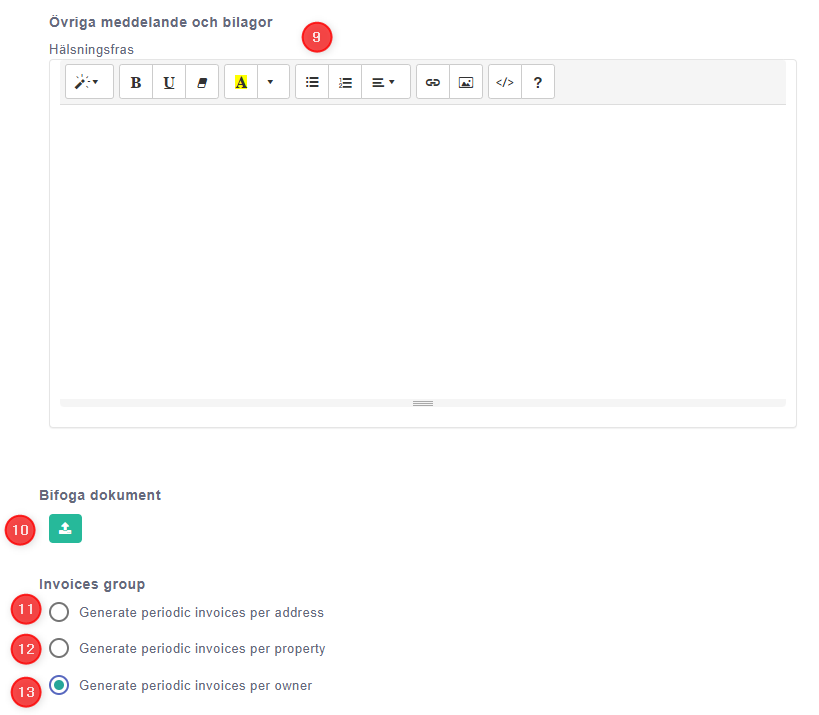
- Custom message – The system allows the user to define a custom message for the periodic invoice template. This custom message will be added to all the invoices sent.
- Attachments – The system allows the user to attach documents to the invoice template. These attached documents will be sent to the invoice recipient as an attachment to the invoice.
Grouping the invoice: There are three ways of grouping the invoice.
- Per address – The periodic invoices will be generated per address. All the connections belongs to a single address will be included to a single invoice as separate invoice lines.
- Per property – The periodic invoices will be generated per property. All the connections belongs to a single property will be included to a single invoice as separate invoice lines.
- Per owner – The periodic invoices will be generated per owner. All the connections belongs to a particular owner will be included to a single invoice as separate invoice lines.
- Click on the next button to move to the third step of the wizard to select the invoice recipients.
Step 3 – Select invoice recipients
In the third step of the wizard, the user is required to set the invoice recipients, whom will receive the invoices created through this wizard.
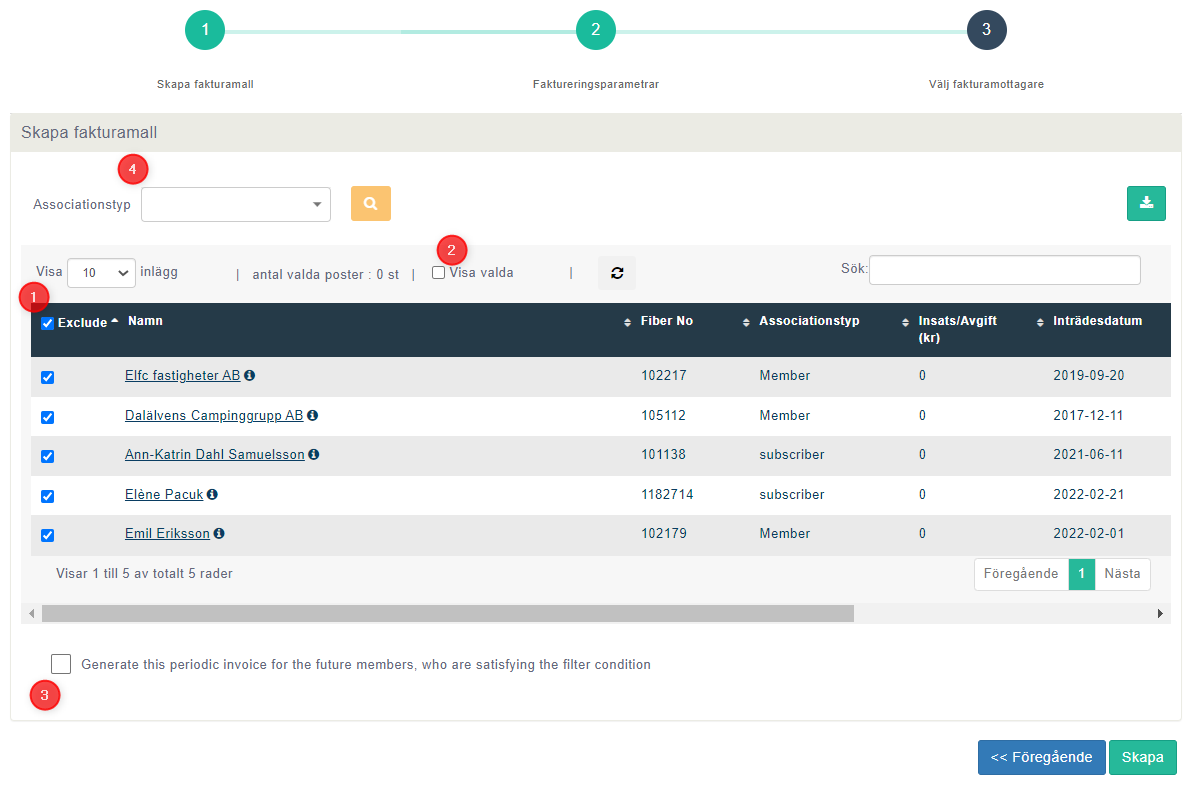
- Exclude recipient – When the user moves to third step of the wizard, the system checks the invoices that are been created for the selected periodic product. Then the remaining subscribers are displayed in this grid. by default all the records in the grid are selected and the user is given the option to exclude them from creating periodic invoices. user is required to untick the relevant entries and set the recipient list.
- By clicking this field, only the selected subscribers will be loaded to the grid.
- Generate periodic invoice for the future members. By ticking this field, all the future members enroll to the system whom are entitled to the periodic product will receive the periodic invoices automatically (there will be no need for the admin to manually add the future members to periodic invoice process.)
- Filter by customer type – This drop box allows user to decided whether to load the “Members” and/or “Subscribers”.
- Upon the completion of all three steps of the wizard, the user must click on the “Create” button to complete the template and save it in the system.
