Change of ownership takes place when a property owner is transferring his property to another person. In such a situation the property owner may request to transfer the ownership of the connections to the new owner. The system allows the admin, property seller, or buyer to initiate the transfer process.
There are three options;
- Admin can initiate the change of ownership and transfer the connection from the old owner to the new owner.
- The property seller can initiate the change of ownership. This requires admin approval.
- The buyer of the property can ask for a change of ownership. This requires admin approval.
Method 1 – Admin Initiates the change of ownership
- Go to Market & customers.
- Select the property from the grid
- Go to the “Change of ownership” tab
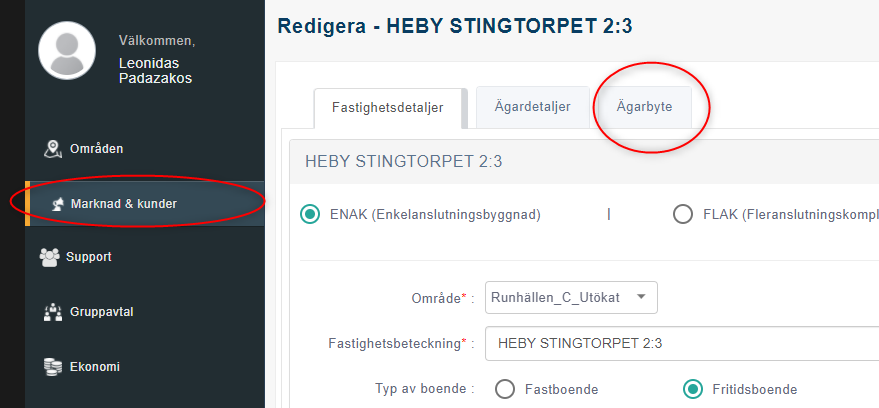
Step 1 – Change contact information & communication preferences
This is the first step of the wizard. The user is asked to add the contact information of the new owner.
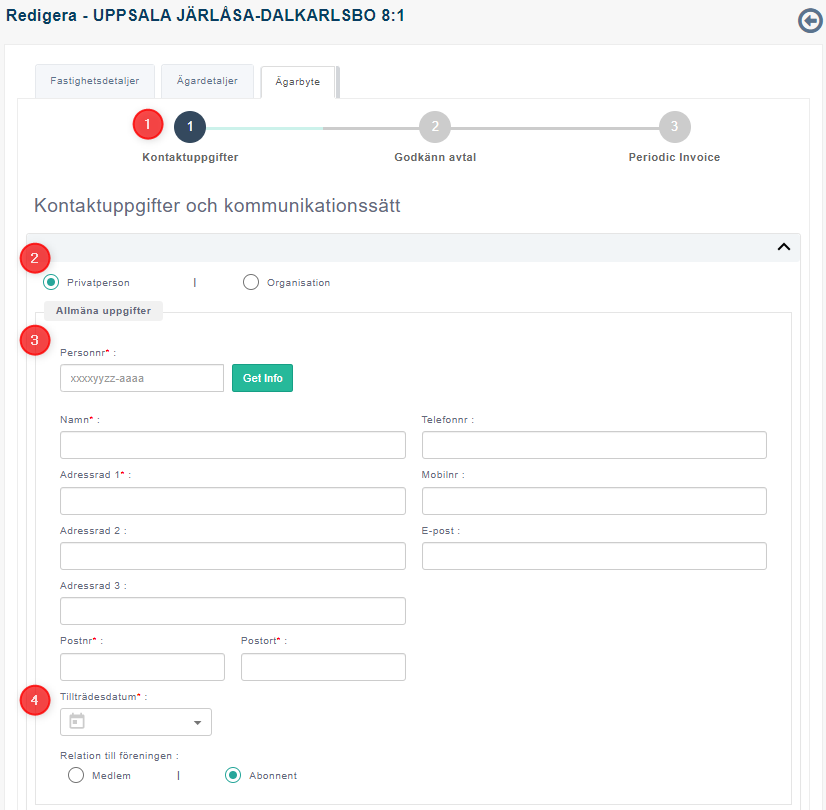
- Indicates that the user is in the contact information tab.
- Select the type of the new property owner (Whether he is an individual or an organization).
- Enter personal information. Type the SSN / Organization number and click on the “Get info” button to check whether the person already exists in the system. If the person exists, the name and the contact information will be auto-filled. Else, the user must enter them manually.
- Set the date where the new owner will be moved to the property. The property will be under the old owner until this date is reached. All the invoices (subscription and periodic invoices if any) will be created for the new owner based on this date.
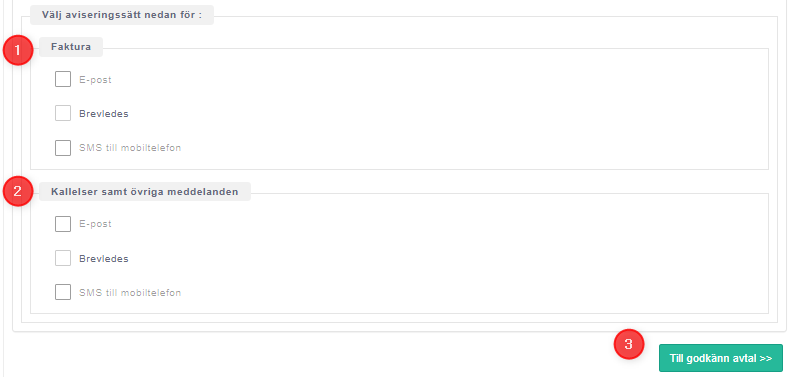
- Set invoice communication preferences.
- Set other communication preferences.
- Move to step 2 of the wizard (approval stage).
Step 2 – Agreement approval
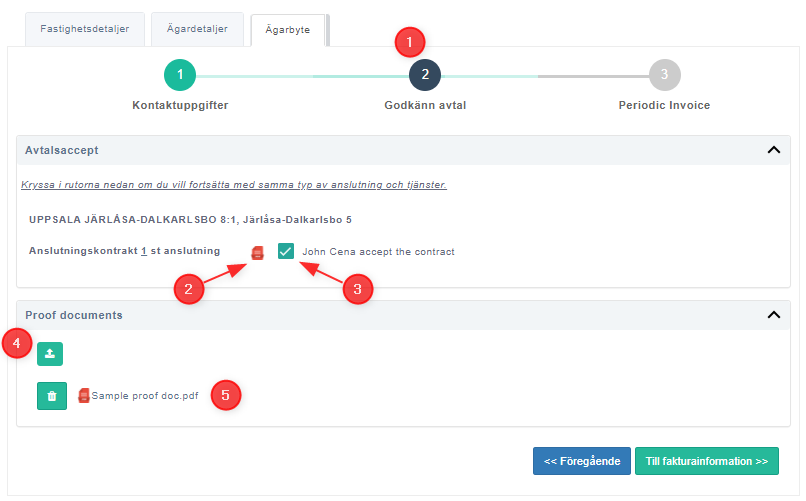
- Indicates that the user is in the second step of the wizard
- View connection contract document.
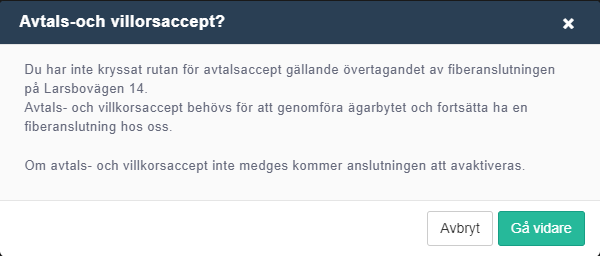
- Tick the checkbox if the new owner accepts the change of ownership. When ticking the transfer happens automatically and the new owner will be created new invoices (if there are any). Else, the transfer request will be forwarded to the admin for approval.
- Upload proof documents. Users may upload any supporting documents here.
- View / delete supporting documents.
Click on the next button to move to the third step of the wizard.
Step 3 – Create subscription invoices (If any unpaid pending invoice)
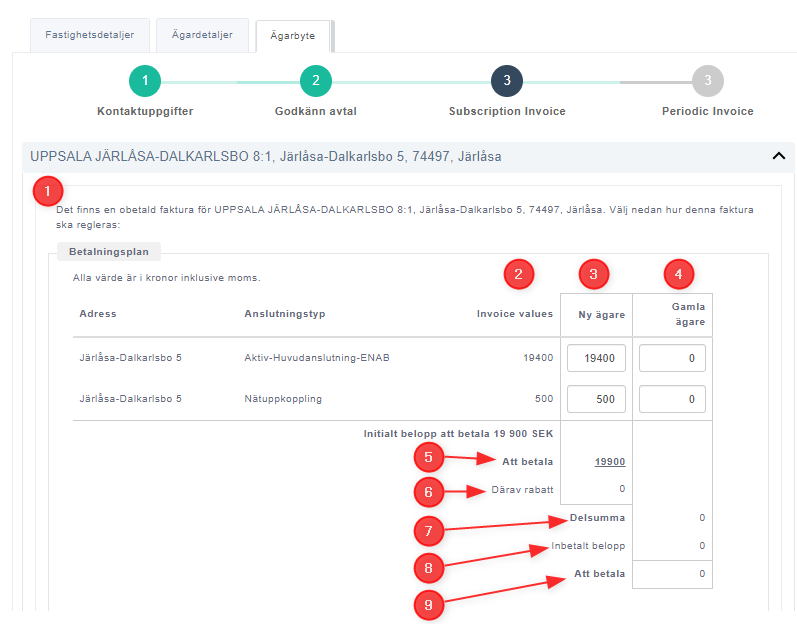
- Indicates that there is an unpaid subscription invoice. It advises the user to define how the invoice should be settled.
- This column Shows the line-wise values of the original invoice, which was not paid.
- This column suggests the line-wise invoice values to be transferred to the new property owner. By default, all the balances are suggested to be paid by the new owner. The user is given the option to change the values.
- This column suggests the line-wise invoice values to be paid by the old owner. By default, the values in this column are zero. The user is given the option to change the values and allocate a portion to be paid by the old owner. It is possible to split the balance amount between old and new owners.
- Total amount to be paid by the new owner.
- The discount value. (read the next section to understand the discount calculation mechanism).
- Subtotal – the amount to be paid by the old owner.
- Amount already paid.
- Amount to be paid by the old owner.
- Making a price adjustment during the change of ownership
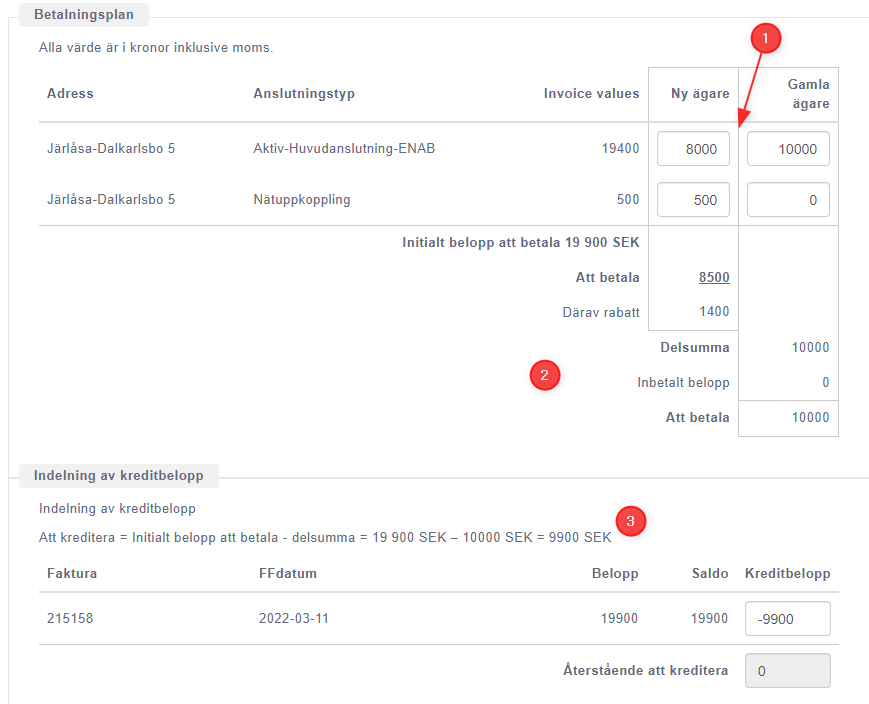
- User is given the option to adjust the cost applied for the new owner.
- If the price is reduced than the initial invoice, then the reduced amount is shown under the discount section. If the price is increased, the discount is shown as zero.,
- Calculation of the credit amount. The amount to be credited = Initial invoice amount to be paid – The amount to be paid by the old owner. The system shows all the unpaid invoices under the old owner and suggests the allocation of credit amounts to them. The user can change the allocation as per his requirement. The maximum allocation amount is restricted to the balance of the pending invoice.
The price adjustment is displayed at the fiber contract as follows. (Here the initial price of the fiber connection was 19 400 kr, Old owner agreed to pay 10 000 kr and the amount allocated to the new owner is 8 000 kr. Therefore the connection price at the new owner’s fiber contract is shown as 10 000 kr + 8 000 kr = 18 000 kr.

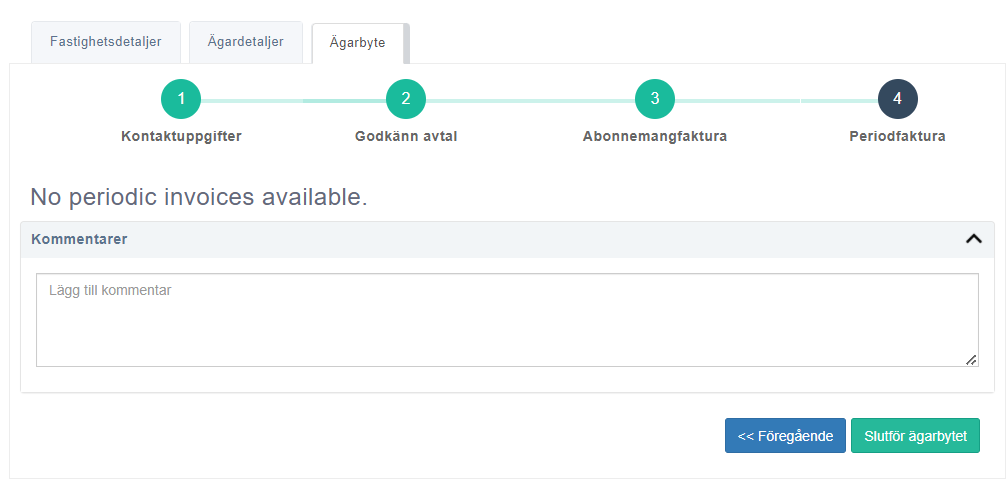
Step 4 – Create periodic invoices
- This will be the fourth step of the wizard if the changing property is having any unpaid subscription invoice. Else, creating periodic invoices will be the third step in the wizard.
- At this point, a new periodic invoice will be created for the new owner. The old owner is supposed to pay the old periodic invoice.
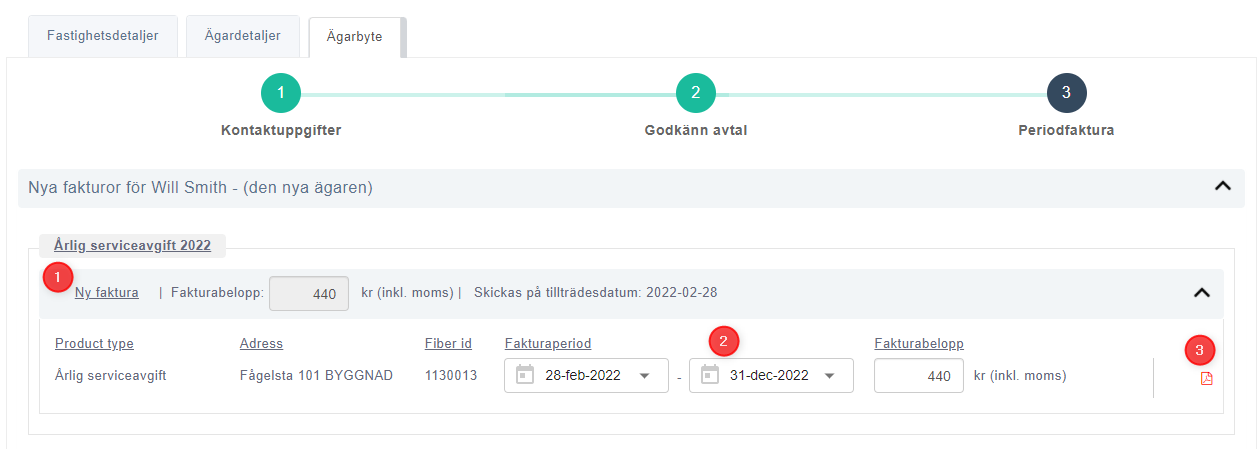
- Information of the new invoice. It shows the invoice value and the invoice sending date. Usually, the invoice sending date will be the date that the new owner enters the property.
- At the invoice line-wise details level, it is possible to change the invoice period and the invoice amount.
- If the invoice period is changed, then the invoice amounts will be changed accordingly.
- Changing the line-wise cost will not make any impact on the invoice period. It will change only the invoice amount.
- Click the icon to view the draft invoice.
If there are no periodic invoices, the fourth step will contain no invoice information. It will indicate to the user that there are no periodic invoices available
Method 2 – The seller of the property initiates the change of ownership

- Click on the ‘change of ownership’ icon on the home page and proceed to the change of ownership process.

- Select the option “Seller” to proceed.
Step 1 – Select the property
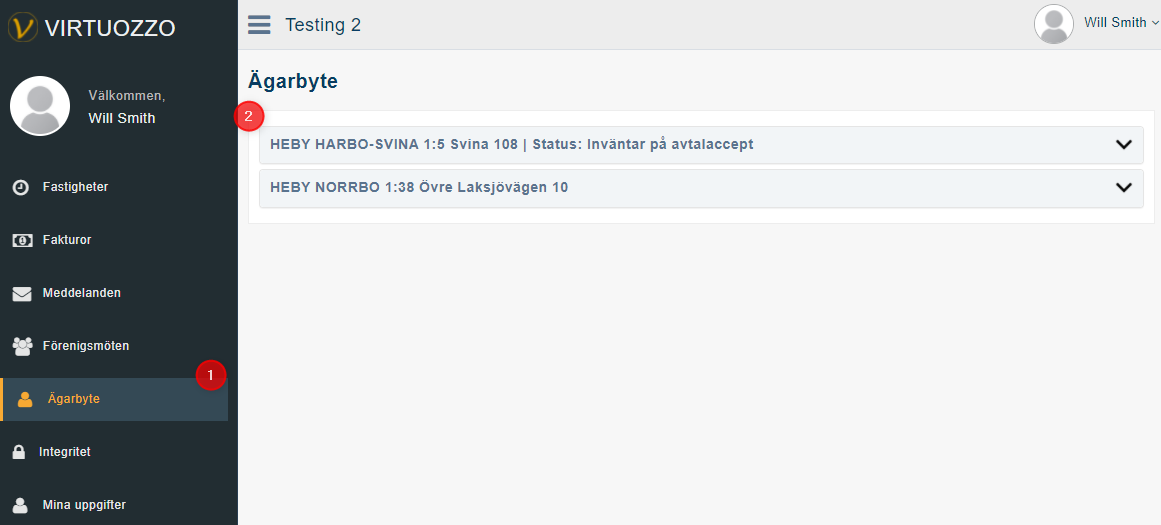
The system leads the user to his portal. For the subscribers, this is a limited portal showing only the properties belonging to himself.
- System has led the user to the “Change of ownership” function.
- All the properties belonging to the user are listed. Select the property that needs to be transferred to the new owner.
Step 2 – Set the details of the new owner
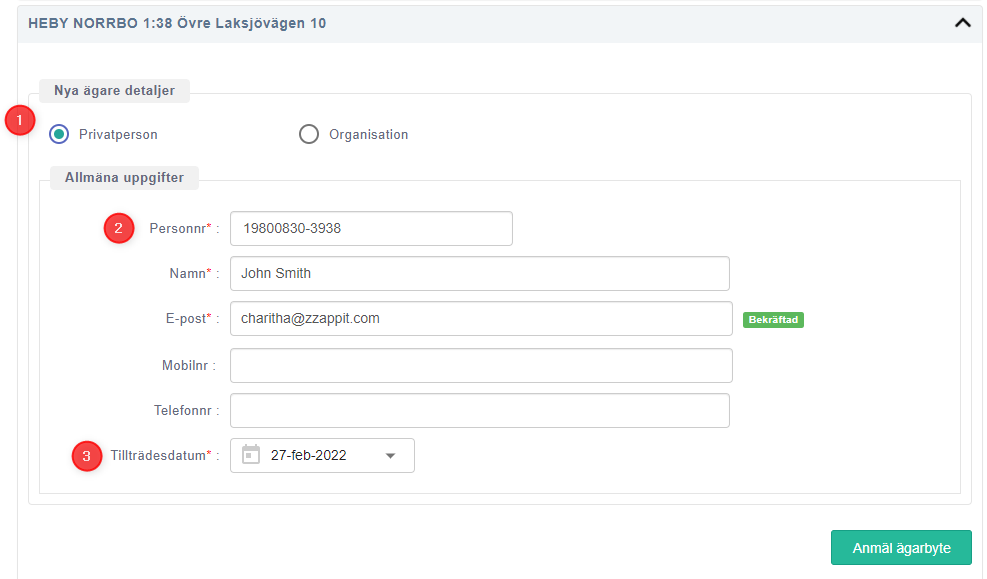
- Set whether the new owner is a private person or an organization.
- If the owner is a private person, enter the Social security number. If the new owner exists in the system, his details will be filled in automatically. (The same process is applicable for the organizations).
- Set the date where the new owner moves to the property.

When complete step 2, the transfer process happens at the backend. At the end of a successful transfer, a success message will be displayed.
Method 3 – The buyer of the property initiates the change of ownership
When a property is transferred to a new owner, the buyer (new owner) can request a change of ownership of the connection(s).

- Click on the ‘change of ownership’ icon on the home page and proceed to the change of ownership process.
Step 1 – Select property

- When the user is directed to change of ownership, he will be given the option to select the mode. The system will ask whether the user is proceeding as the ‘Seller’ or the ‘Buyer’. Select the option ‘buyer’ in this context.
- Buyer must search for the property that he wishes to own. Entering a partial property name may give a list of matching entries. In such a situation the user must select the relevant property.
- Enter the BankID and proceed to validate. (Note: When the seller is requesting a change of ownership, only the BankID validation is enabled.)
Step 2 – Set contact information
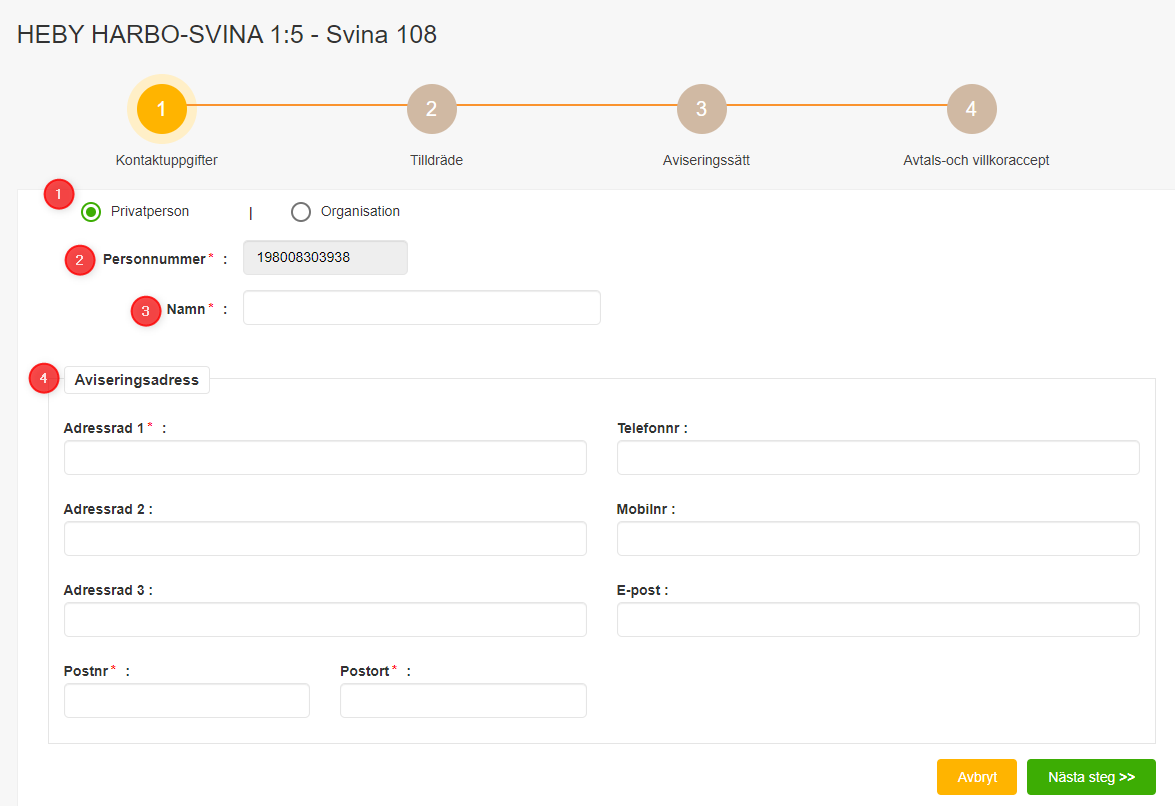
- System automatically populates the details of the subscriber. It automatically sets whether the user is a private person or an organization. The user is given the option to change the mode.
- User Identification number (SSN or Organization number) is filled automatically. This field remains read-only.
- Name of the user has been filled in automatically. The user is given the option to change the name.
- Contact details of the user is filled in automatically. The user is given the option to change the contact details.
Step 3 – Set entrance date
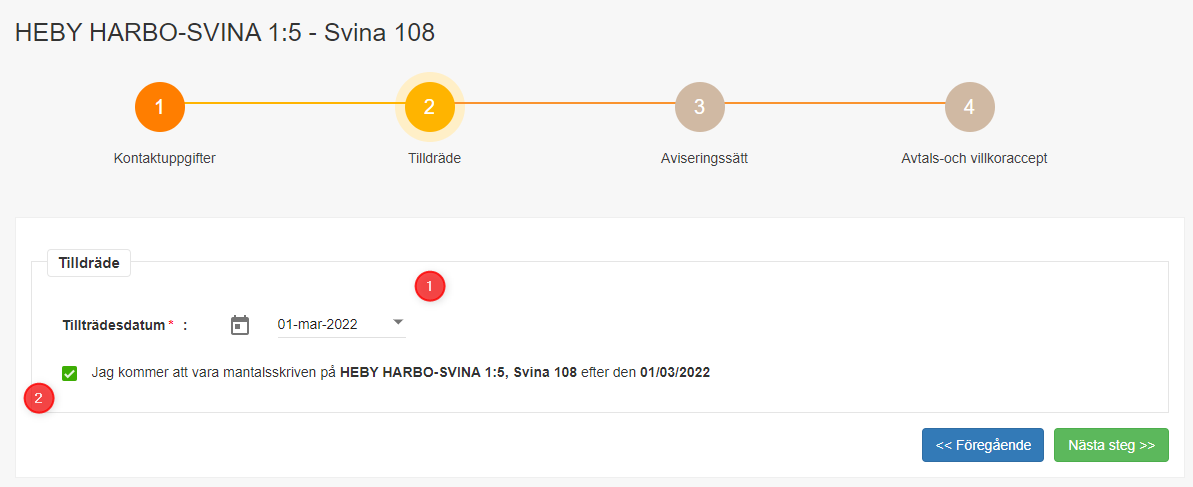
- Set the entrance date of the new user to the property.
- When the entry date is set, the user will be asked whether he is moving to the property or not. This field enables the user to indicate whether he moves to the property after the entry date, which is mentioned above.
Step 4 – Set communication preferences
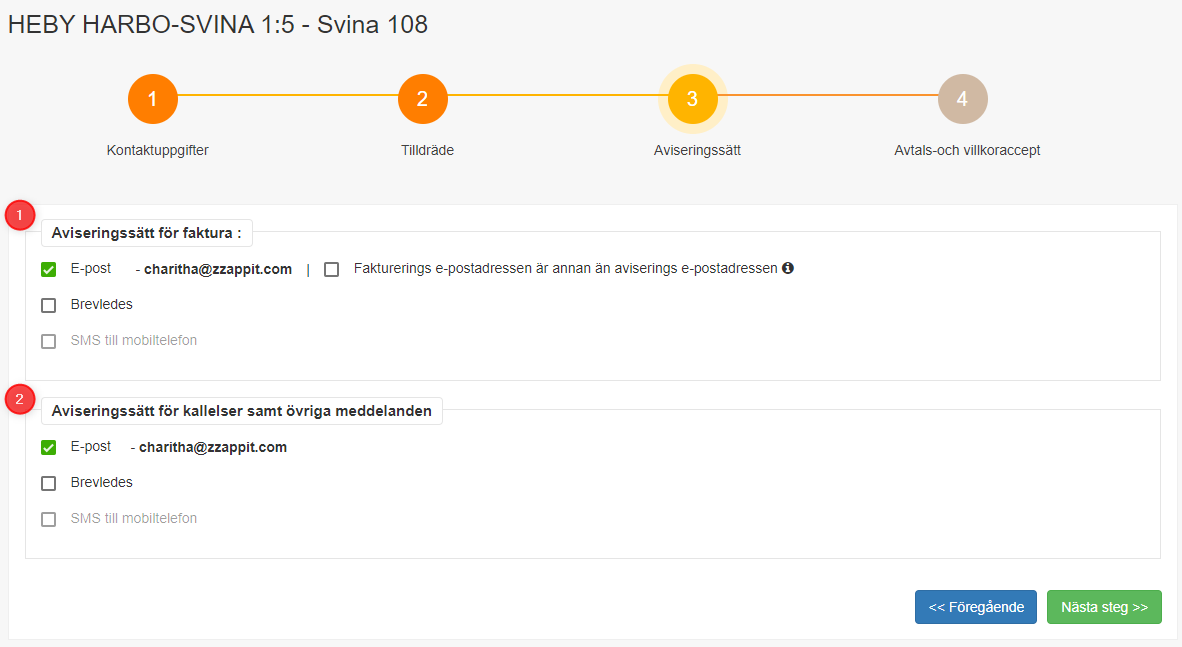
- Set a communication method for the invoice notifications.
- Set communication method for the invoice notifications.
note: It is possible to set email, post, or SMS for both communication preferences. Further, it allows to set different email and post addresses from the default communication method.
Step 5 – Acceptance of the contract
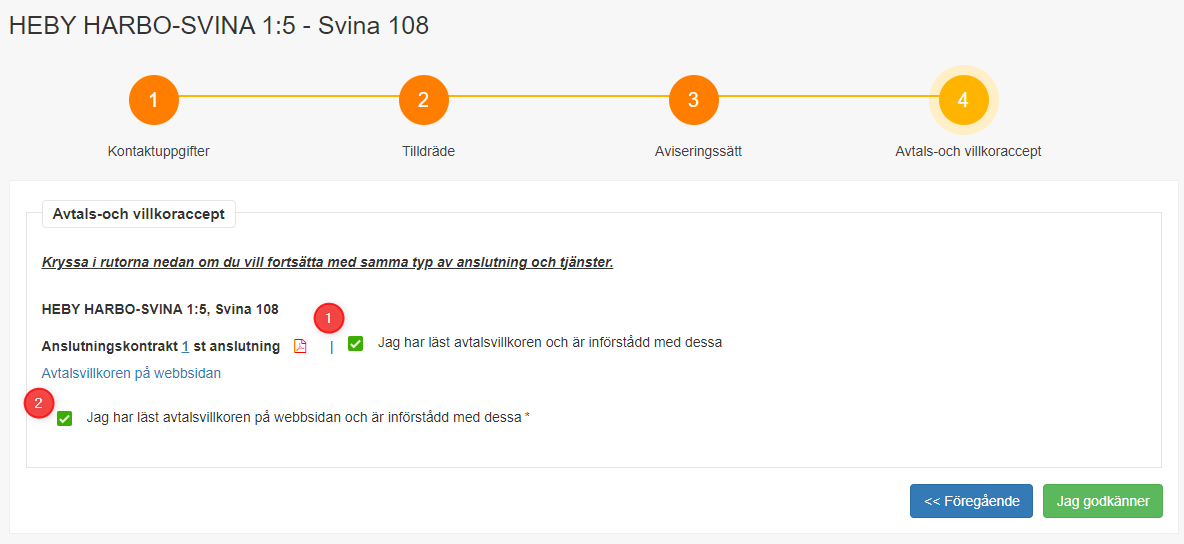
- View the contract by clicking on the PDF icon. Give the consent to the contract by ‘ticking’ on the check box.
- View the general terms and conditions by clicking on the PDF icon. Give consent to the terms and conditions by ‘ticking’ on the check box.
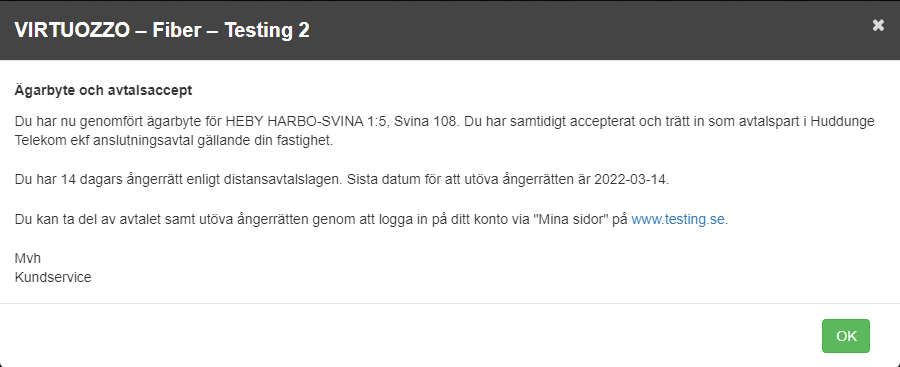
When complete step 5, the transfer process happens at the backend. At the end of a successful transfer, a success message will be displayed.
Admin Approving the change of ownership
There are three scenarios where the admin requires to approve the ownership;
- When the buyer requests for change of ownership.
- When the seller initiates the change of ownership.
- When the admin initiates the change of ownership but does not complete the approval during the change of ownership wizard.
In such situations, Admin requires to go to the edit mode of the property and approve the change manually. The change of ownership can be seen at;
- “Market and customers” view, in the main grid. For more information refer “Change of ownership indicator” section in “market and customers main view” section.
- The “to do list” at the “Support view”. For more information refer “Support view – To do list“.
Change of ownership showing on “Support view”

- On the “To do list” section, the change of ownership records that needs to be approved are shown. a pop-up with the pending approval records are shown.
- Change of ownership initiated by the seller.
- Change of ownership initiated by the buyer
- By clicking on the arrow, the system opens the “Market and customers” main view.
Change of ownership entries shown on “Market and customers” grid
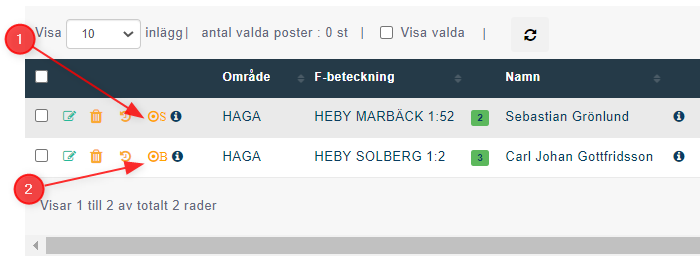
- The letter “S” indicates that the change of ownership is initiated by the seller.
- The letter “B” indicates that the change of ownership is initiated by the buyer.
- Go to edit view and approve the change of ownership.
